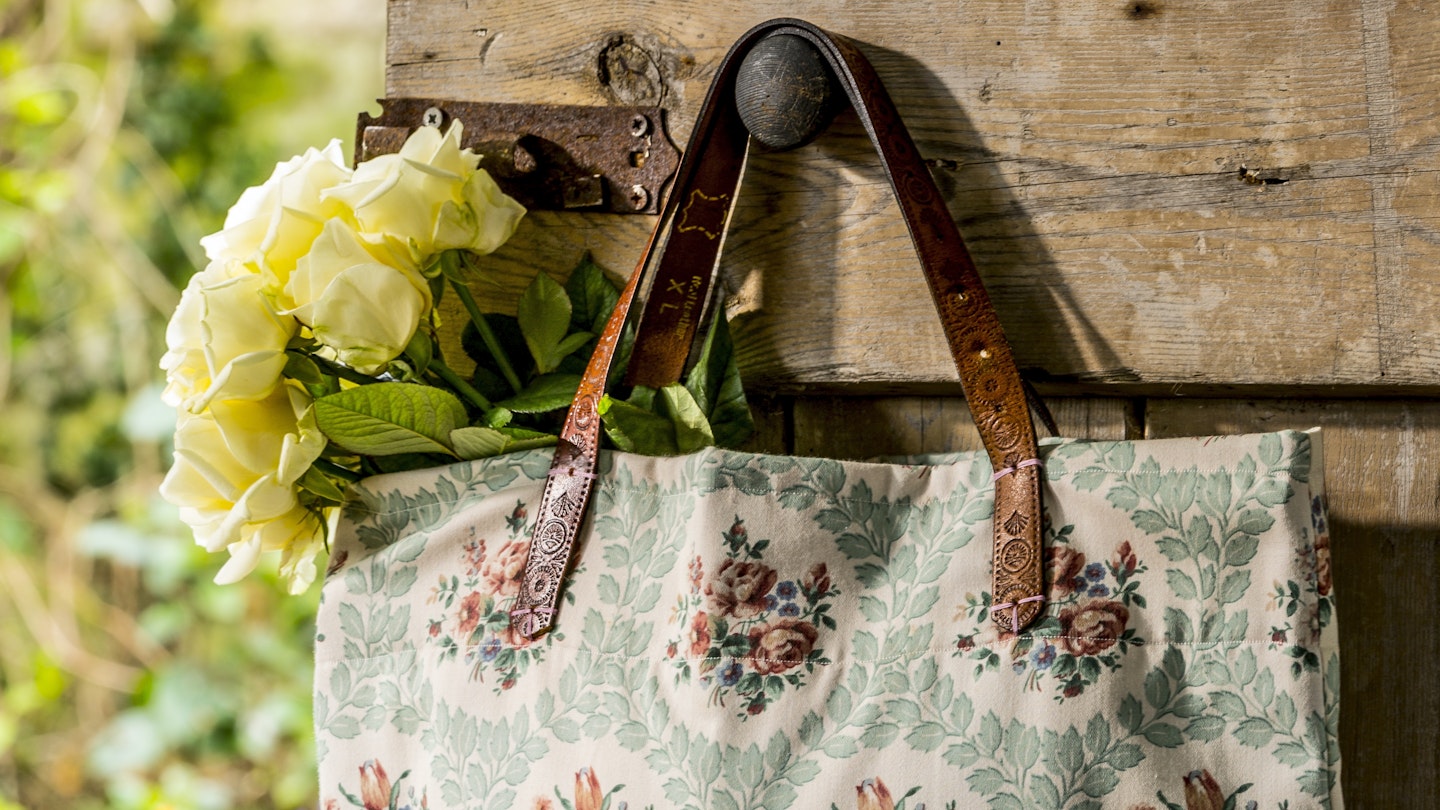
An old curtain and a leather belt are given a new lease of life as a stylish and useful bag, lined with a pillowcase. No pattern is required as the bag follows the shape of the pillowcase, so it is simple to make. The heavy weight of the curtain fabric means the bag will be hard wearing. It has many uses, ranging from a handy shopping bag to carrying beach towels for a day at the seaside. Indoors, it will keep all the components of on-going craft projects together.
Materials
Recycled curtain
Old leather belt, extra large length
Standard size pillowcase
Cotton thread
Tape measure
Sharp scissors for cutting fabric
Sewing machine
Hand sewing needles
Dressmaking pins
Iron
How to make the bag
Step 1: The curtain is washed and ironed. The pillowcase is turned inside out and ironed.
Step 2: The inside-out pillowcase is placed on a flat surface. The top section, where the pillow is normally tucked in, is removed by cutting through the full thickness of the pillowcase. This forms the lining bag with a raw top edge. The cut off section is not used.
Step 3: The header tape and any hemmed edges are cut off the curtain to leave a piece of fabric with four cut edges. Care is taken to make sure the edges are straight.
Step 4: Two pieces of curtain material are cut using the lining bag as a template. If the curtain has a pattern, care is taken to ensure this is the right way up before cutting. Centring a repeat pattern gives neat finish.
Step 5: The two curtain pieces are pinned together with right sides facing. Again, care is taken to ensure the pattern is the right way up.
Step 6: The pinned curtain pieces are machine stitched together using running stitch, forming the sides and bottom of the bag. The seams are the same distance apart as those on the pillowcase so that an identical bag is made. The top of the bag is left raw at this stage, but the three seamed edges may be sealed with a zigzag stitch to give extra strength.
Step 7: The bag lining is turned back the right way and placed inside the inside-out curtain bag. Care is taken to ensure right sides of both bags are facing together. The side seams and top edges of each bag are aligned. The two bags are pinned together around the top.
Step 8: Running stitch is used to sew the bags together ⅜in (1cm) in from the top edge. A 6in (15cm) hole is left, enough to put a hand through.
Step 9: The whole bag is pulled through this hole. This forms an oblong with curtain fabric at one end, pillowcase lining at the other, and the join and 6in (15cm) hole in the middle. No raw seams are visible. The lining bag is pushed down into the main bag to form the lining.
Step 10: The top of the bag is pinned around ensuring a neat top edge. Running stitch is used to sew around, ⅛in (3mm) down from the top to firmly hold the lining and bag together and close the 6in (15cm) hole.
Step 11: The top of the bag is now folded in by 2⅜in (6cm) and pressed. Running stitch is used to sew around the top and bottom of the folded down band. Extra care is taken as this stitching will be visible on the outside of the bag. It forms a stiffened band for attaching the handles.
At this point the bag may be left square or turned inside out and stitched diagonally across at the bottom corners to make a clipped shape. A small triangle of fabric is created on the two inside corners when creating a clipped shape. This can be left on or cut off and the edge sealed with zigzag stitch if desired.
To attach the handles

Step 1: The buckle is cut off the belt and the remaining length cut in half. The ends are trimmed to a pleasing shape.
Step 2: The belt handles are attached to the bag using the original holes. Additional holes are made in the leather with a hammer and nail over an unwanted block of wood. Care is taken to position the pieces of belt against the bag and check the length and position of handles before additional holes are added. If longer handles are desired, one whole belt is used for each handle. See picture for position of holes.
Step 3: Each of the four handle ends are firmly hand-stitched to the outside of the bag. Contrasting thread gives a decorative effect. Using the holes in the belt they are stitched through the full thickness of the top band.
Once finished, a gentle press gives the bag a crisp finish.
Project: Rachel Hawkins; Photography: Richard Faulks
1.
Subscribe today!
Take out a LandScape subscription
LandScape brings the fresh air of the British countryside into your home. With a mix of beautiful photography and in-depth features, it captures the very best of every season, from stunning landscapes and places to visit to the best of British traditional cookery and crafts. Choose the right Subscription offer for you… Receive 12 issues with free UK delivery to your door with a Print Subscription. Get easy access to the digital issues, Member-only rewards and more by taking out a Digital Subscription or choose a Print + Digital Subscription and get everything included.